
How do I log into my Cloakbox VPN Router?
- First, make sure this computer is connected to your CloakBox via WiFi (wireless) or Ethernet (cable).
- To log in to your CloakBox please click here: 192.168.20.1
Note: The above is the default address we ship the CloakBox VPN routers with. If you have reset your router at any point, you may need to use one of these alternate links: 192.168.11.1 - or - 192.168.50.1 - or - 192.168.1.1
If the link does not work, please copy the link or just type it directly into the address bar in your browser. - You will be prompted for a username and password. Enter the details provided with your CloakBox. Default settings are as follows:
- Username = admin (must be all lowercase)
- Password = your account number - see below for further details
The password was included in the box with your the router. Please check under the lid.
You can also view your account number by logging in to your portal account, CLICK HERE TO LOG IN
Your account number will be shown at the top-middle of the page (Acccount#: w00xxxx), next to your referral code.
How do I change the VPN location in my DD-WRT Cloakbox VPN Router?
1. Log in to your CloakBox
2. Click on the Services Tab, and then the VPN sub-tab

3. Scroll down to the OpenVPN Client Section
4. Change the Server/IP to the desired server address.
OpenVPN Server Address Locations
USA OpenVPN SSL VPN Gateways
vpn.atlanta.witopia.net
vpn.baltimore.witopia.net
vpn.boston.witopia.net
vpn.chicago.witopia.net
vpn.dallas.witopia.net
vpn.kansascity.witopia.net
vpn.lasvegas.witopia.net
vpn.losangeles.witopia.net
vpn.miami.witopia.net
vpn.newyork.witopia.net
vpn.newark.witopia.net
vpn.portland.witopia.net
vpn.phoenix.witopia.net
vpn.redding.witopia.net
vpn.sanfrancisco.witopia.net
vpn.seattle.witopia.net
vpn.washingtondc.witopia.net
Canada OpenVPN SSL VPN Gateways
vpn.montreal.witopia.net
vpn.toronto.witopia.net
vpn.vancouver.witopia.net
Central/South America OpenVPN SSL VPN Gateways
vpn.mexicocity.witopia.net
Europe OpenVPN SSL VPN Gateways
vpn.amsterdam.witopia.net
vpn.barcelona.witopia.net
vpn.berlin.witopia.net
vpn.brussels.witopia.net
vpn.bucharest.witopia.net
vpn.budapest.witopia.net
vpn.copenhagen.witopia.net
vpn.dublin.witopia.net
vpn.frankfurt.witopia.net
vpn.helsinki.witopia.net
vpn.istanbul.witopia.net
vpn.lisbon.witopia.net
vpn.london.witopia.net
vpn.luxembourg.witopia.net
vpn.madrid.witopia.net
vpn.milan.witopia.net
vpn.moscow.witopia.net
vpn.mumbai.witopia.net
vpn.oslo.witopia.net
vpn.paris.witopia.net
vpn.prague.witopia.net
vpn.riga.witopia.net
vpn.rome.witopia.net
vpn.reykjavik.witopia.net
vpn.stockholm.witopia.net
vpn.vienna.witopia.net
vpn.vilnius.witopia.net
vpn.warsaw.witopia.net
vpn.zurich.witopia.net
Africa/Middle East OpenVPN SSL VPN Gateways
vpn.jerusalem.witopia.net
Asia OpenVPN SSL VPN Gateways
vpn.bangkok.witopia.net
vpn.hongkong.witopia.net
vpn.kualalumpur.witopia.net
vpn.newdelhi.witopia.net
vpn.singapore.witopia.net
vpn.seoul.witopia.net
vpn.tokyo.witopia.net
Oceania OpenVPN SSL VPN Gateways
vpn.melbourne.witopia.net
vpn.auckland.witopia.net
vpn.sydney.witopia.net
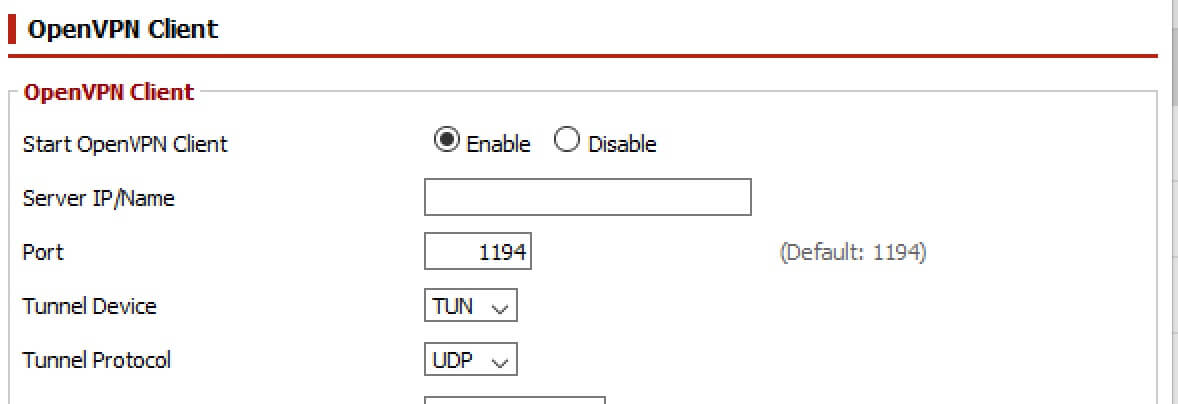
5. Click Save
6. Restart the CloakBox
To restart your CloakBox click on the Administration tab, then scroll to the bottom of the page. Click Reboot Router
How do I update my cert/keys after renewing in my DD-WRT Cloakbox VPN Router?
1. Log in to your Cloakbox (Log in instructions shown in first FAQ item.)
2. Click the Services Tab, and then VPN sub-tab
3. Scroll down to the OpenVPN Client Section
4. Delete the details in the Public Client Cert section, and the Private Client Key section
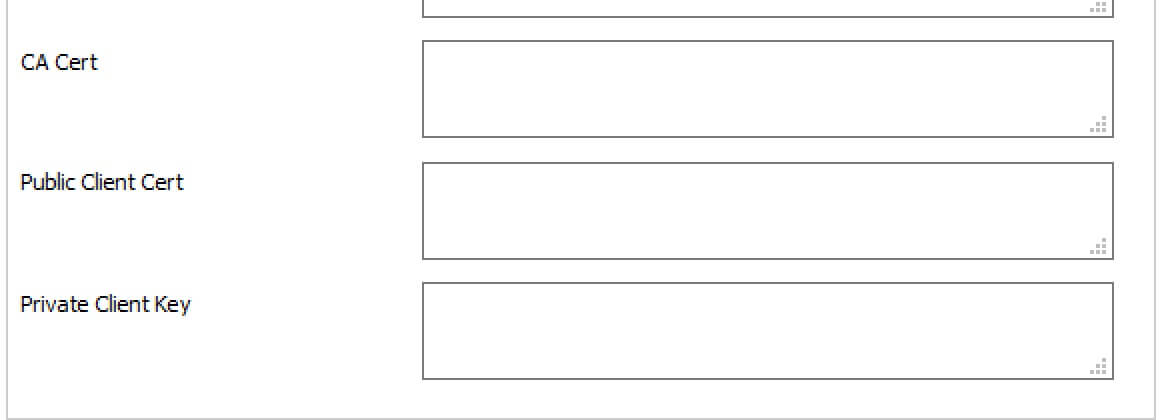
5. Log into your customer account here
6. From your account dashboard, click View Credentials, next to your Cloakbox order number.
7. Copy & paste all three of the certificates/key from your the Cloakbox Credentials page, into the following fields on your Cloakbox router:
** NOTE: Click “Copy” above each certificate and key, to copy the text.
- Server/CA Certfificate = CA Cert
- Your Certificate = Public Client Certificate
- Your Private Key = Private Client Key
8. After copy & pasting all certificates and keys, click ‘Save’.
9. Restart the CloakBox by clicking “Reboot” from the “Administration tab”.
Your CloakBox is now up to date. Enjoy!
How do I change the DNS in my DD-WRT Cloakbox VPN Router?
1. Log in to your CloakBox
2. Click on the Setup tab
3. Click on the Basic sub-tab This is the default page
4. Scroll to the middle of the page in the Network section
5. Set all THREE DNS fields
CLICK HERE for alternate DNS providers you can use
6. Click Save
7. Restart the CloakBox
To restart your CloakBox click on the Administration tab, then scroll to the bottom of the page. Click Reboot Router
How do I change the wireless SSID in my DD-WRT Cloakbox VPN Router?
1. Log in to your CloakBox
2. Click on the Wireless tab
3. Click on the Basic Settings sub-tab
4. Change the Wireless Network Name (SSID) to what you would like
5. Click Apply
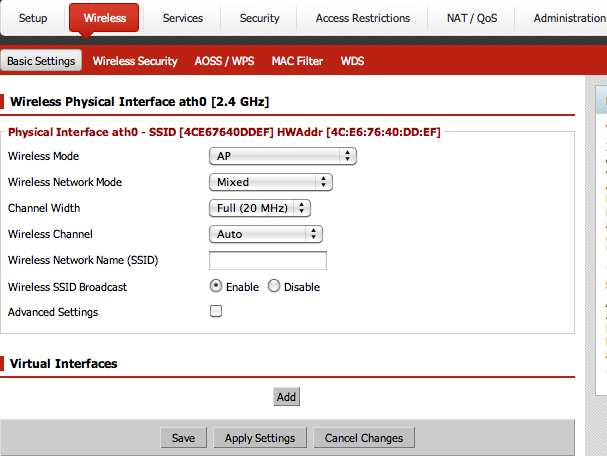
6. Click Save
7. Restart the CloakBox
To restart your CloakBox click on the Administration tab, then scroll to the bottom of the page. Click Reboot Router
How do I change the wireless password in my DD-WRT Cloakbox VPN Router?
1. Log in to your CloakBox
2. Click on Wireless Tab
3. Click on the Wireless Security sub-tab
4. Change the WPA2/Personal Key to the value you like
For better security it is suggested to change the Security Mode to WPA or WPA2 and then set the WPA/2 Shared Key
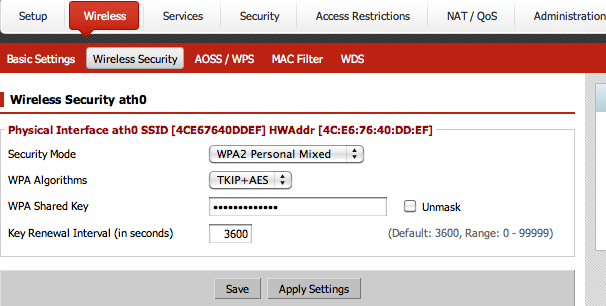
5. Click Save
6. Restart the CloakBox
To restart your CloakBox click on the Administration tab, then scroll to the bottom of the page. Click Reboot Router
How do I get the VPN logs from DD-WRT Cloakbox VPN Router?
You will need to obtain the log file BEFORE you reboot the unit. Once you reboot the CloakBox then the latest log file will be lost.
1. Log in to your CloakBox
2. Click on the Status tab

3. Click on the OpenVPN sub-tab

4. Copy the entire output and send to support