
IPsec Certficate Installation
- From your computer download our IPSec certificate.
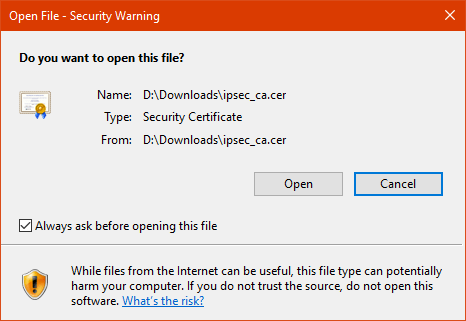
DOWNLOAD CERT - Double click the ipsec_ca.cert file located in your downloads folder
- Click OPEN when prompted on the file open warning
-
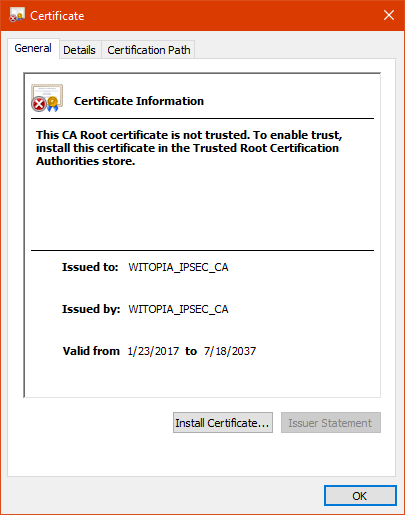
- Click on Install Certificate
-
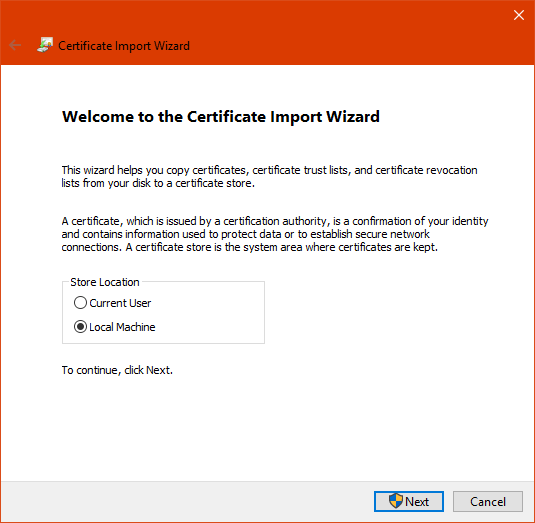
- Choose "local machine" and then click next
-
- Click OK on the UAC pop-up/windows
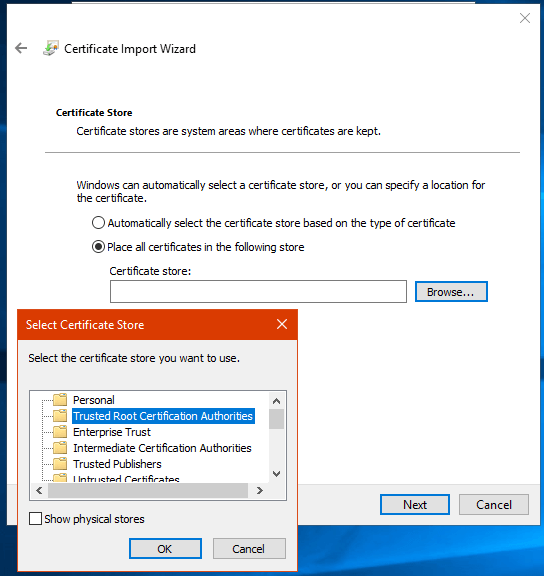
- Click pn "Place all certificates in the following store
- Click on "Trusted Root Certification Authorities and then click OK
- Click on finish
- click ok on the success window, and the certificate window
Setup IKEv2 VPN Connection
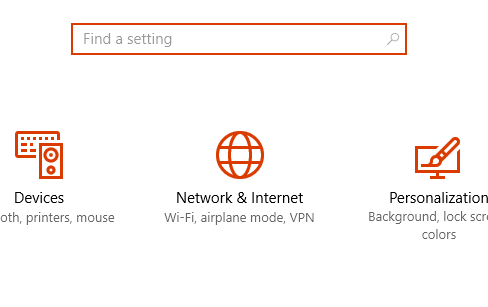
- Start -> Settings (cog icon for windows 10)
- Click on Network -> VPN
- Click on Add a VPN connection
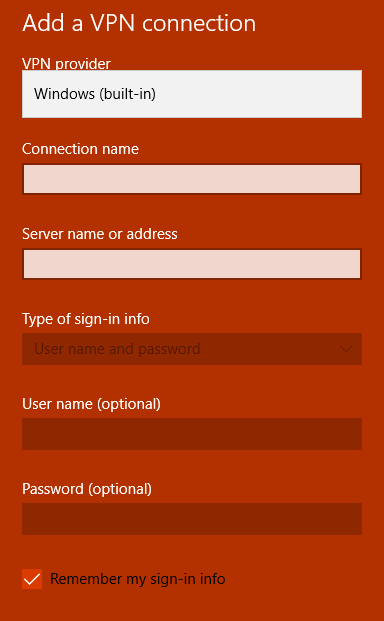
- Fill in the following fields:
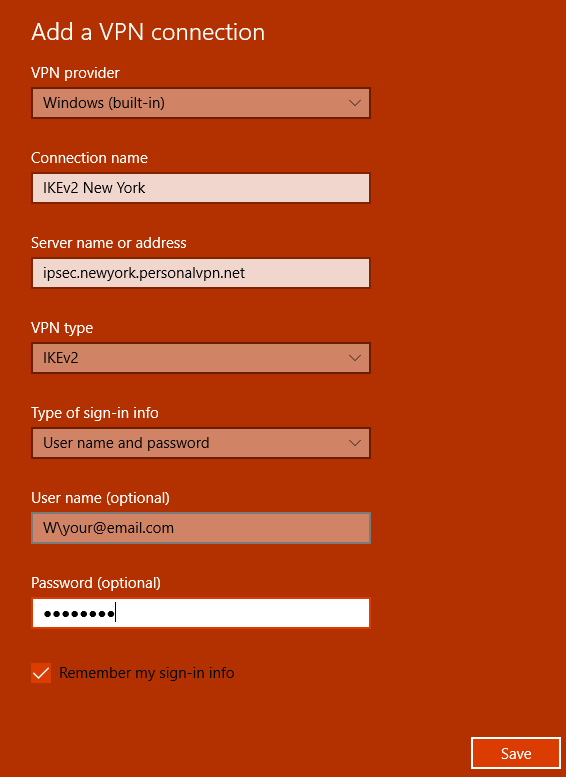
- VPN Provider: Windows (built-in)
- Connection Name: You can name it anything, this is for your management
- Server name or Address: (you can choose any location you like)
- VPN Type: IKEv2
- Type of Sign-in info: Username and Password
- Username: [your vpn usernme]
- Check the Remember my sign-in info
IPSec Server Location Addresses
USA IPSec VPN Gateways
ipsec.atlanta.witopia.net
ipsec.baltimore.witopia.net
ipsec.boston.witopia.net
ipsec.chicago.witopia.net
ipsec.dallas.witopia.net
ipsec.denver.witopia.net
ipsec.kansascity.witopia.net
ipsec.losangeles.witopia.net
ipsec.lasvegas.witopia.net
ipsec.miami.witopia.net
ipsec.newark.witopia.net
ipsec.newyork.witopia.net
ipsec.phoenix.witopia.net
ipsec.portland.witopia.neta
ipsec.redding.witopia.net
ipsec.sanfrancisco.witopia.net
ipsec.seattle.witopia.net
ipsec.washingtondc.witopia.netCanada IPSec VPN Gateways
ipsec.montreal.witopia.net
ipsec.toronto.witopia.net
ipsec.vancouver.witopia.netCentral/South America IPSec VPN Gateways
ipsec.mexicocity.witopia.net
Europe IPSec VPN Gateways
ipsec.amsterdam.witopia.net
ipsec.barcelona.witopia.net
ipsec.berlin.witopia.net
ipsec.brussels.witopia.net
ipsec.bucharest.witopia.net
ipsec.budapest.witopia.net
ipsec.copenhagen.witopia.net
ipsec.dublin.witopia.net
ipsec.frankfurt.witopia.net
ipsec.helsinki.witopia.net
ipsec.lisbon.witopia.net
ipsec.london.witopia.net
ipsec.luxembourg.witopia.net
ipsec.madrid.witopia.net
ipsec.milan.witopia.net
ipsec.moscow.witopia.net
ipsec.mumbai.witopia.net
ipsec.oslo.witopia.net
ipsec.paris.witopia.net
ipsec.prague.witopia.net
ipsec.riga.witopia.net
ipsec.reykjavik.witopia.net
ipsec.stockholm.witopia.net
ipsec.vilnius.witopia.net
ipsec.warsaw.witopia.net
ipsec.zurich.witopia.netAfrica/Middle East IPSec VPN Gateways
ipsec.jerusalem.witopia.net
ipsec.johannesburg.witopia.netAsia IPSec VPN Gateways
ipsec.bangkok.witopia.net
ipsec.hongkong.witopia.net
ipsec.kualalumpur.witopia.net
ipsec.newdelhi.witopia.net
ipsec.singapore.witopia.net
ipsec.seoul.witopia.net
ipsec.tokyo.witopia.netOceania IPSec VPN Gateways
ipsec.auckland.witopia.net
ipsec.melbourne.witopia.net
ipsec.sydney.witopia.netPowered by HTML5 Responsive FAQ There are two potential formats for your vpn username. You must use the one you selected when you activated your services. If you do not recall this, you can login to your account on our website here and under your active service it says "USERNAME:" and then provides your username. Note the VPN login and website login may not be the same.
Password: [your vpn password]#1: Your email = W\your@email.com #2: WiTopia username = username@witopia
You MUST use a Capital W with a backslash "\" if your vpn username is an email.
If you have a WiTopia vpn username there is no W\ before or .net after the username
- Click Save
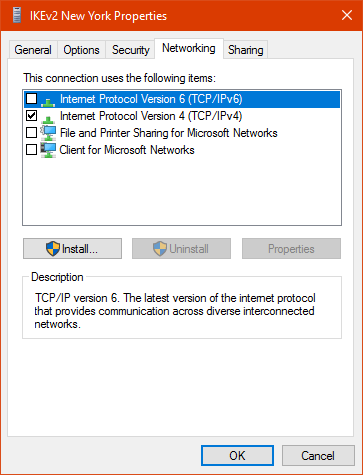
- From the main VPN page click on change adapter settings under Related Settings
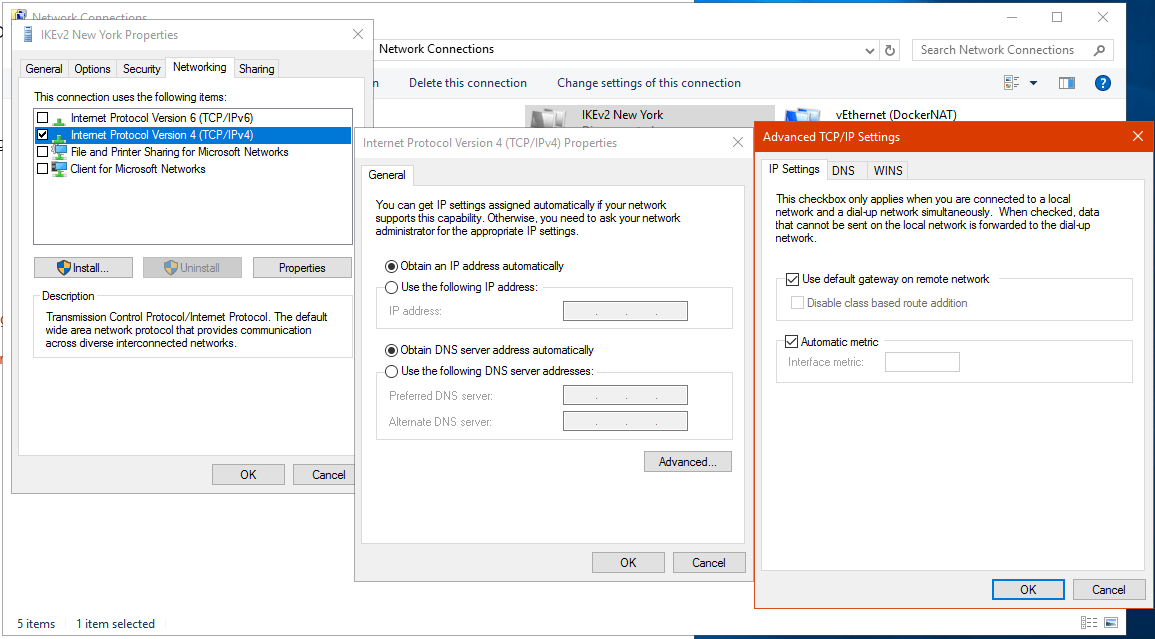
- Right click on the VPN profile name you created (will have IKEv2 as the type listed) and choose properties
- Click on the networking tab
- Uncheck everything EXCEPT IPv4
- Click on IPV4 then properties
- Click on advanced
- Click on "Use default gateway on remote network"
- Click OK on all three open windows
- Close the Network Connection window
- Your VPN is ready to be used
This will open a new window with your network interfaces
Connecting and Disconnecting
- Click on your Network Icon in the bottom right corner (you may need to click the arrow to show all icons)
- This will open the settings page
- Click on the vpn profile to use and click connect
Editting existing VPN profiles
- Start -> Settings -> Network -> VPN
- Click on the profile to edit -> advanced options
- Click on Edit in the new window
- Make the Changes you want and hit save